So, I’m finally getting around to writing a post on making a beehive feeder. You’ll find it necessary to have some sort of feeder from time-to-time. For example, when making a split it may be smart to provide a feeder so the split can get on its feet faster. There are many different types of feeders ranging from tray feeders to bottom board feeders and so on. My problem is that none of them provide enough capacity. I tend to only be at the ranch every week or two and need a feeder that can last. That means capacity!!
I found this post on the internet and used it as the basis for my design:
http://volusiabeekeepers.org/resources/FeederMods.pdf
See my finished unit in Figure 1. This is a nice design because it’s called a “no drown” design. Essentially it provides a “ladder” for the bees to use in case they get into the syrup. In reality, you will get a few random bees drown but the ladder works really well. The only downside I’ve found is that if the feeder pan is full, it’s tough to open up the hive and remove the feeder to do a hive inspection if there’s a significant amount of syrup in the pan.
I made a couple changes to the designs I found on the internet after building two iterations:
Made it taller to accommodate a deeper (higher capacity) pan.
Made the feedhouse detachable to allow easy pan replacement.
I found the original design too restrictive on the pan it would accept. It would not allow a very deep pan which limited pan selection and volume. There was a trade-off between ability to replace the pan and the clearance between the bottom of the feedhouse and bottom of the feeder. With a fixed feedhouse, you had to use kind of a “J” motion to leverage the old pan out and the new one in. I modified the feedhouse by using threaded rod and wingnuts to allow the feedhouse to be removed.
Figure 2 gives a BOM and cut list for the design. It also provides reference numbers for the various pieces used on other drawings.

Figure 1
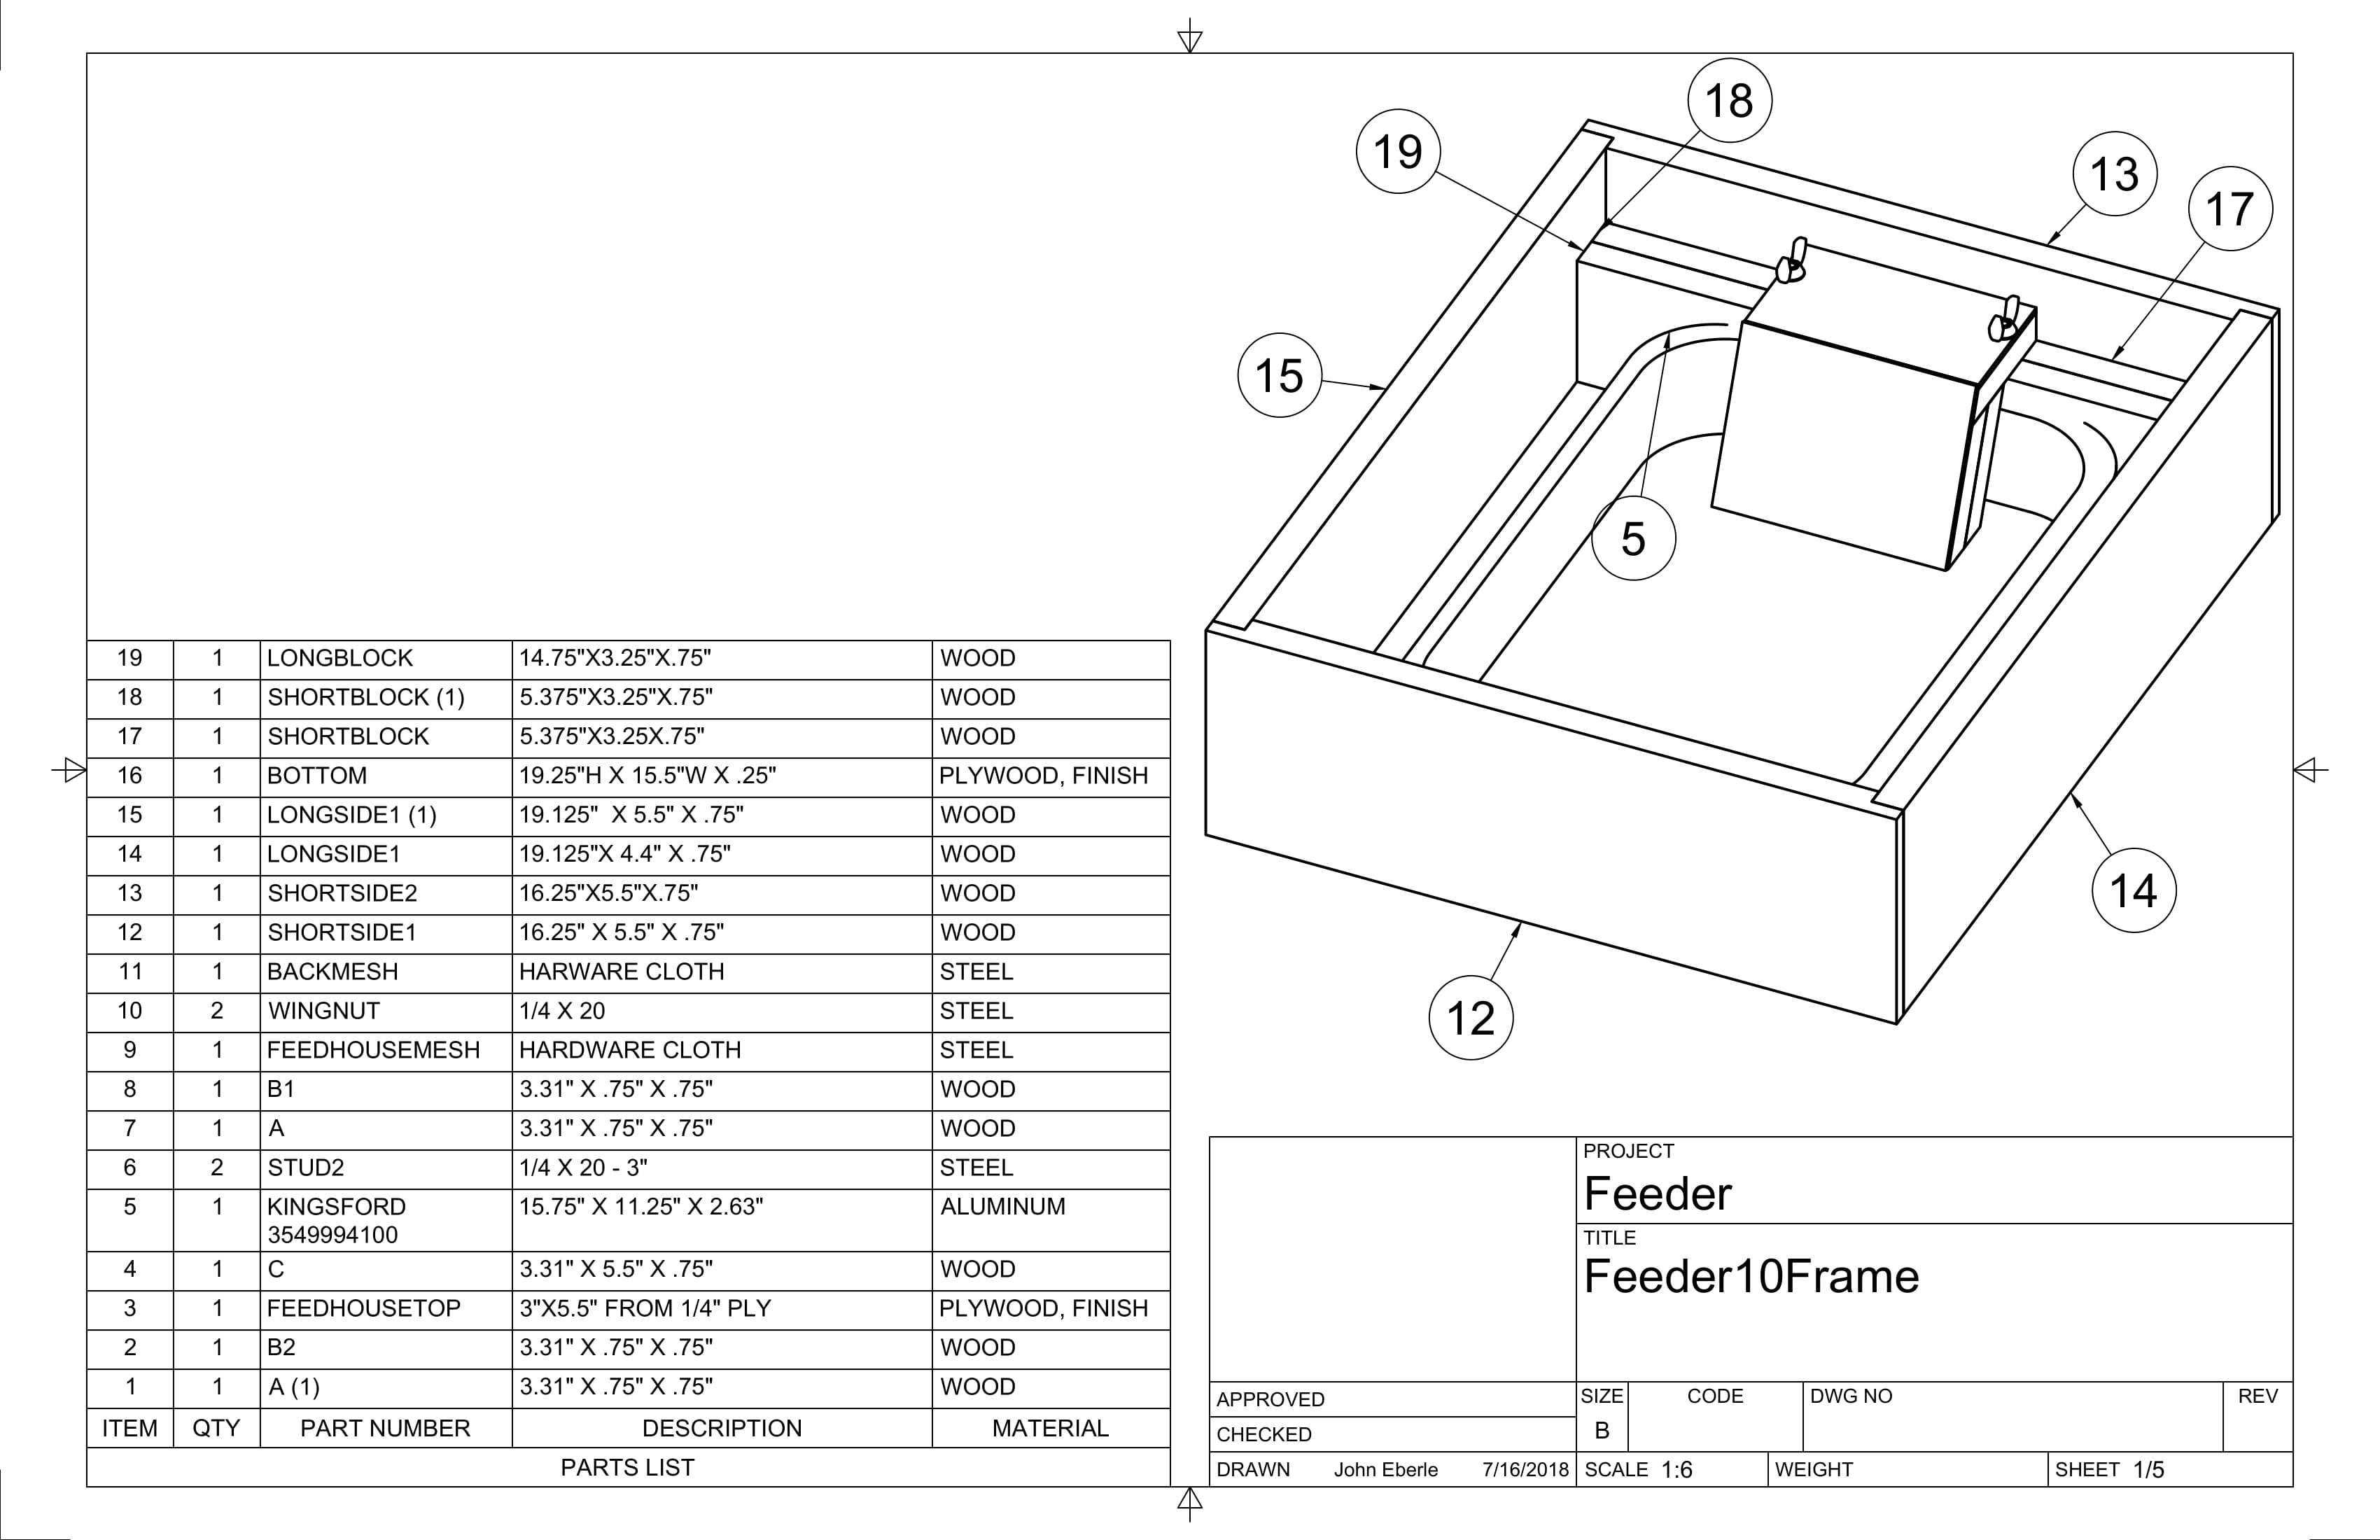
Figure 2
Start by making the frame and bottom board – Figure 3. The long sides are 19 1/8” and the short ones are 16 ¼” . I route the short pieces with ¾” wide by 3/8” deep route to assemble the box. I do this to keep the wood piece end exposure as minimal as possible and also to help make the box square. You could use box joints or whatever….just make sure the outer dimensions remain at 19 7/8” x 16 ¼” (standard 10 frame hive dimensions).
Next, route all sides to accept the bottom – Figure 4. The bottom is ¼” plywood. Route all sides of the frame bottom with 3/8” wide by ¼” deep route.
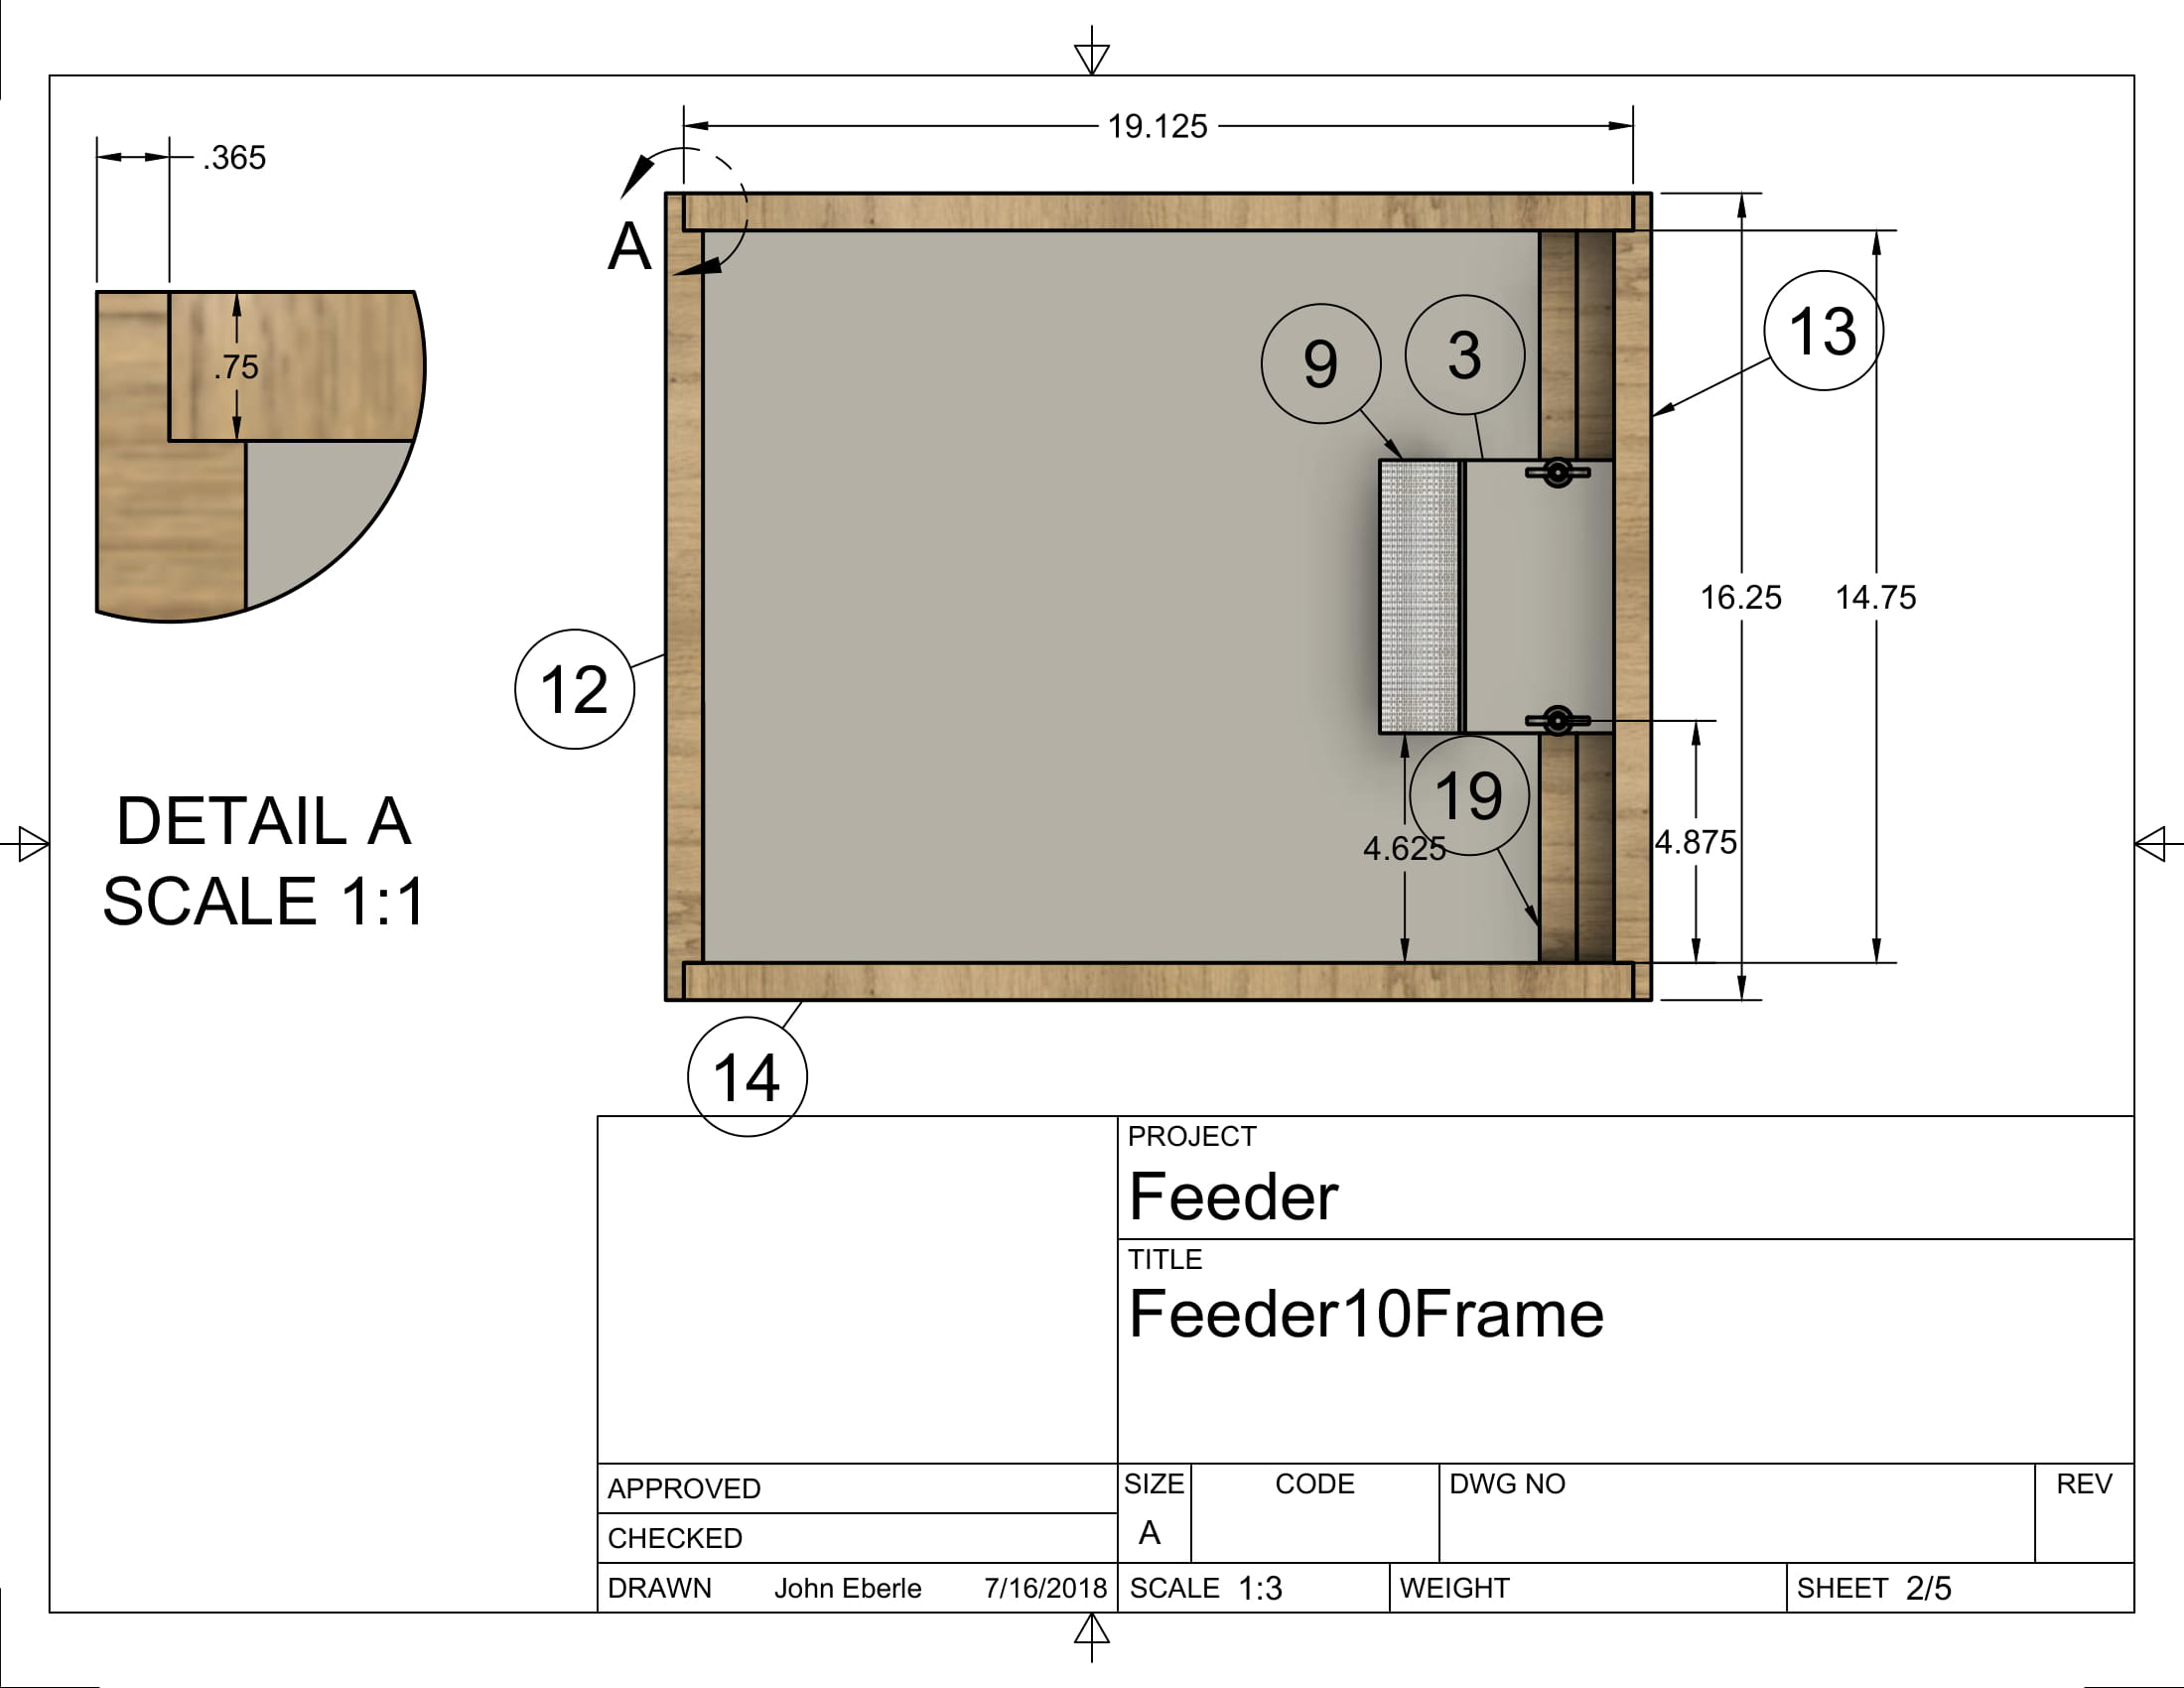
Figure 3
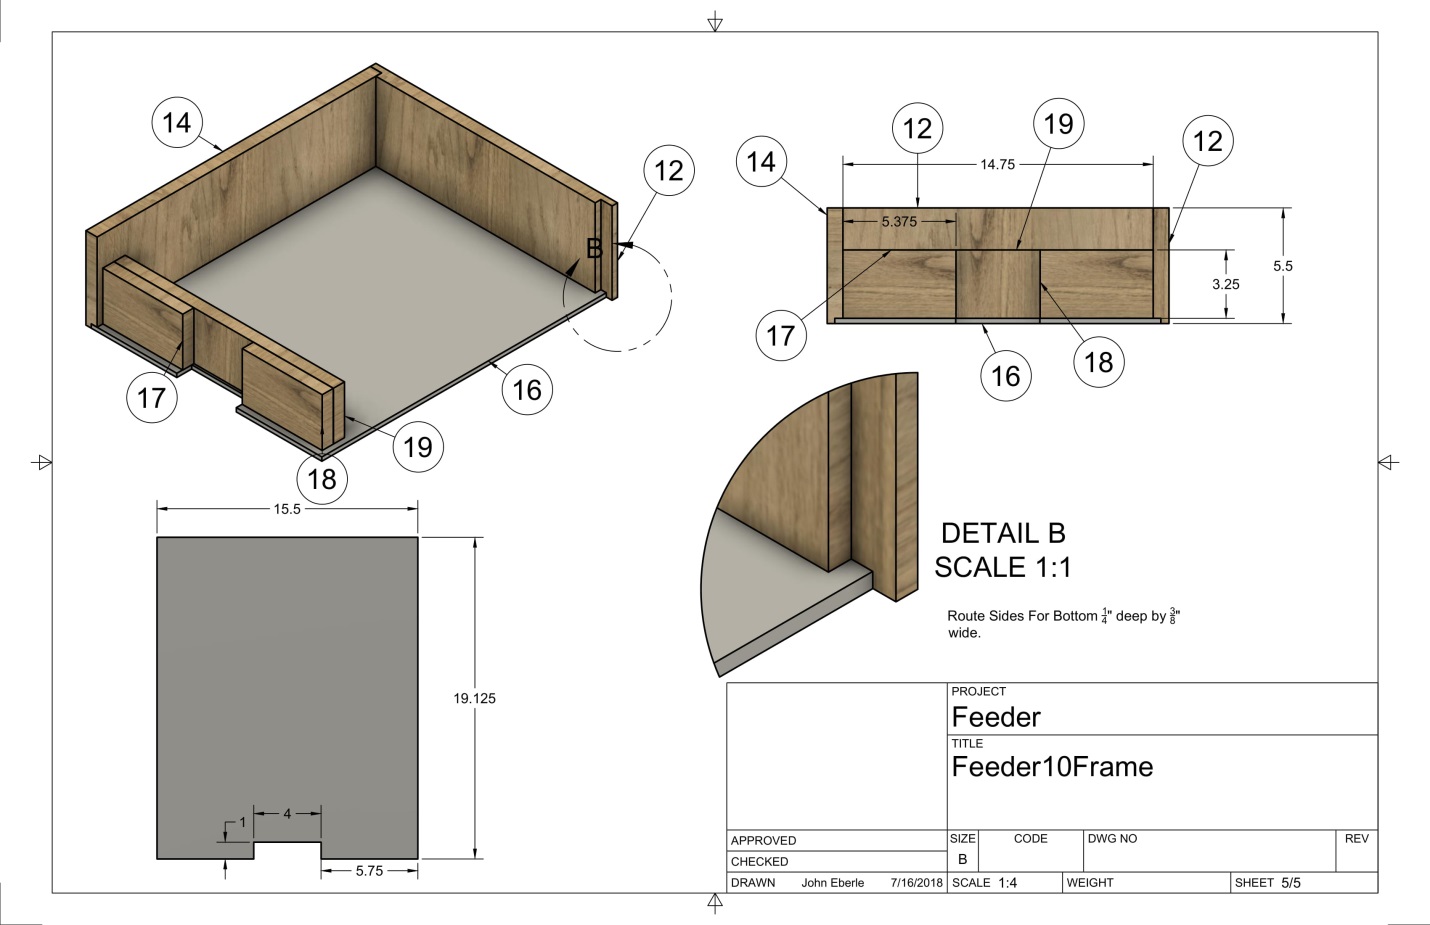
Figure 4
As mentioned, the bottom is made from ¼” plywood. Before assembling the bottom, a cutout must be made as shown in Figure 4. It’s 4” wide by 1” deep. This is the cutout which the bees use to climb up from the deep chambers into the feeder. Last time I built the feeder, I forgot to make the bottom cutout until I had glued and nailed the bottom in. No big deal…just get out the jig saw…but easier to do before assembling.
Next step is to construct the long and short “blocking” pieces. These frame out the “tunnel” which the bees use to get to/from the feed house where they can access the syrup. The blocking pieces consist of 2 short and one long piece. These are only 3 ¼” tall vs the sides which are 5 ½” tall. This is so the feed house can mount onto the top.
Figure 5 Shows the assembled blocking pieces (with mounting studs discussed later).
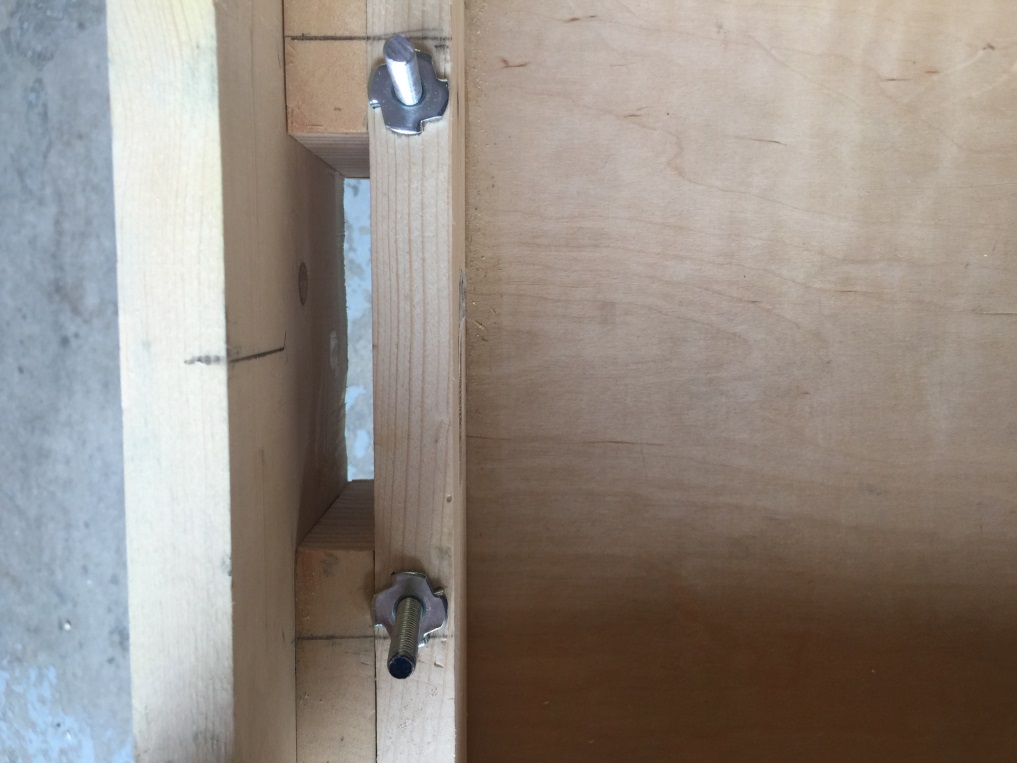
Figure 5
The easy part is now complete. The feed house take the most time to construct. It is shown in Figure 5. Start with Parts A,B, and C. Each of these has one or more 22 ½ degree cuts on it. Part A has the angle on one end. As shown in figure 6, part A is 3” long on one side and 3.3” long on the other.
I like to cut all the ¾” x ¾” (1”by 1”’s) pieces for A and B parts at once. I use a miter saw for this, but a table saw or other could be used. I cut A parts at 3.3” long, then measure the “short” side at 3” and make the 22.5 degree cut. On the B parts, I cut them a little long (maybe 4”) then cut a 22.5 degree end. I then measure back from each side 3.3” and mark to make the second cut. I do exactly the same thing for the C piece except start with a piece that’s 5.5” wide.
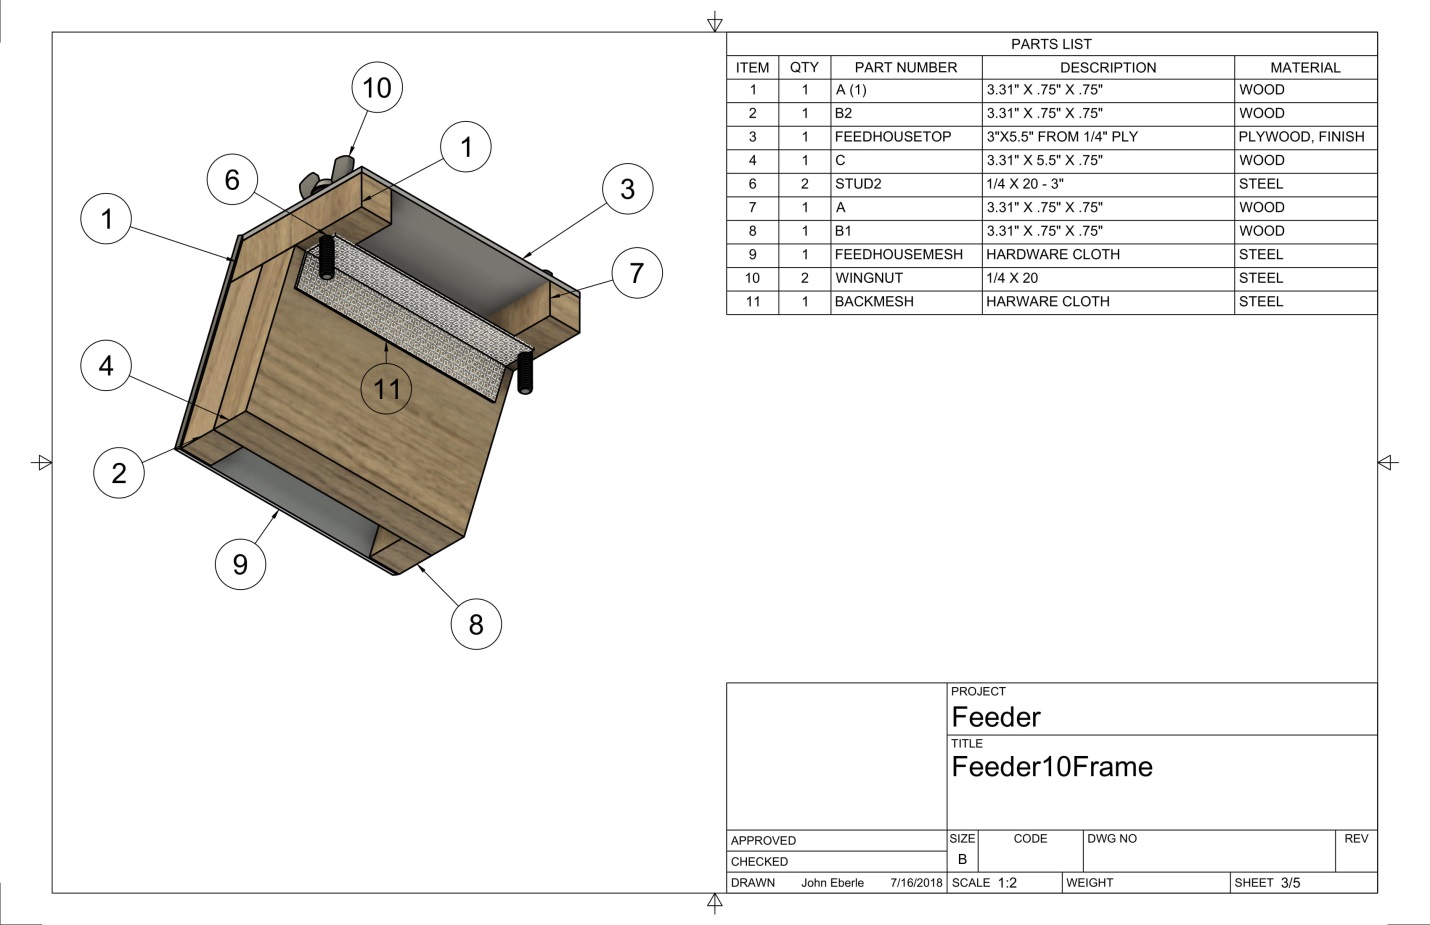
Figure 6
I like to cut the A and B pieces and then mount them together. I then cut a 3” x 5.5” piece of 1/4” plywood for the top and mount the A pieces to it. I then mount the top assembly to the A/B assembly.
At this point it looks as shown in Figure 7.
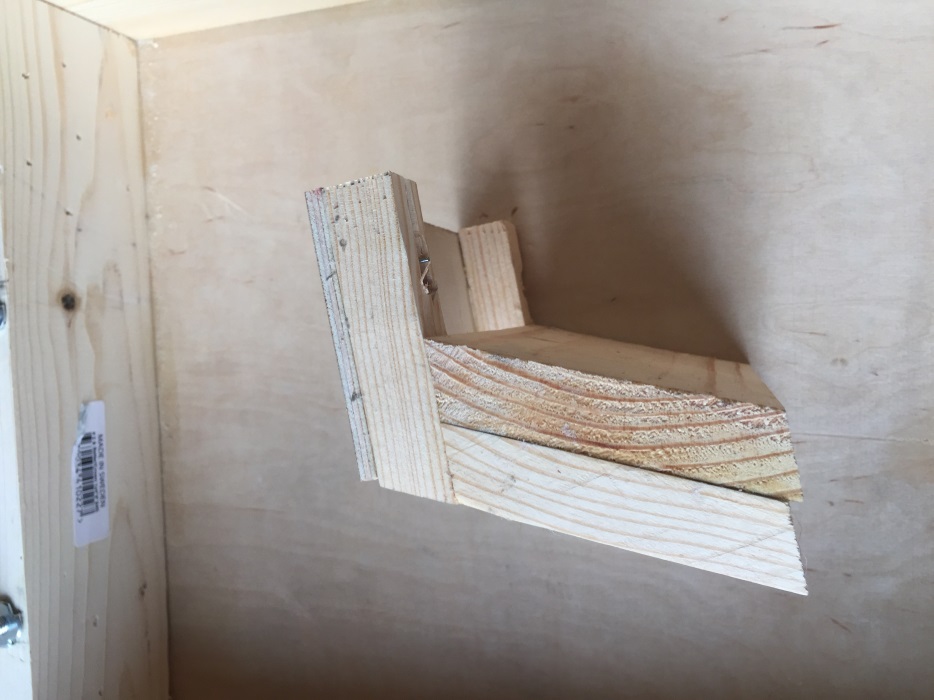
Figure 7
Next it’s time to mount the studs for the feed house as shown in Figure 5. I measured 1 1/8” from the back wall (90 degree edge) of the feed house top and moved in ¼” – see Figure 8 and marked the position to drill each side. I then place the feed house into the feeder and align the center points. I then drill a hole slightly larger than ¼” and about 2 ¾”” deep. Note: Figure 5 shows T-Nuts mounted to the feeder with the studs mounted into the T-Nuts. It turns out I DON’T like this method after all. I ended up removing the T-NUT’s and simply epoxyed the studs in place. I cut the studs from ¼” threaded rod about 3” long and push them snugly into the drilled holes filled with epoxy.
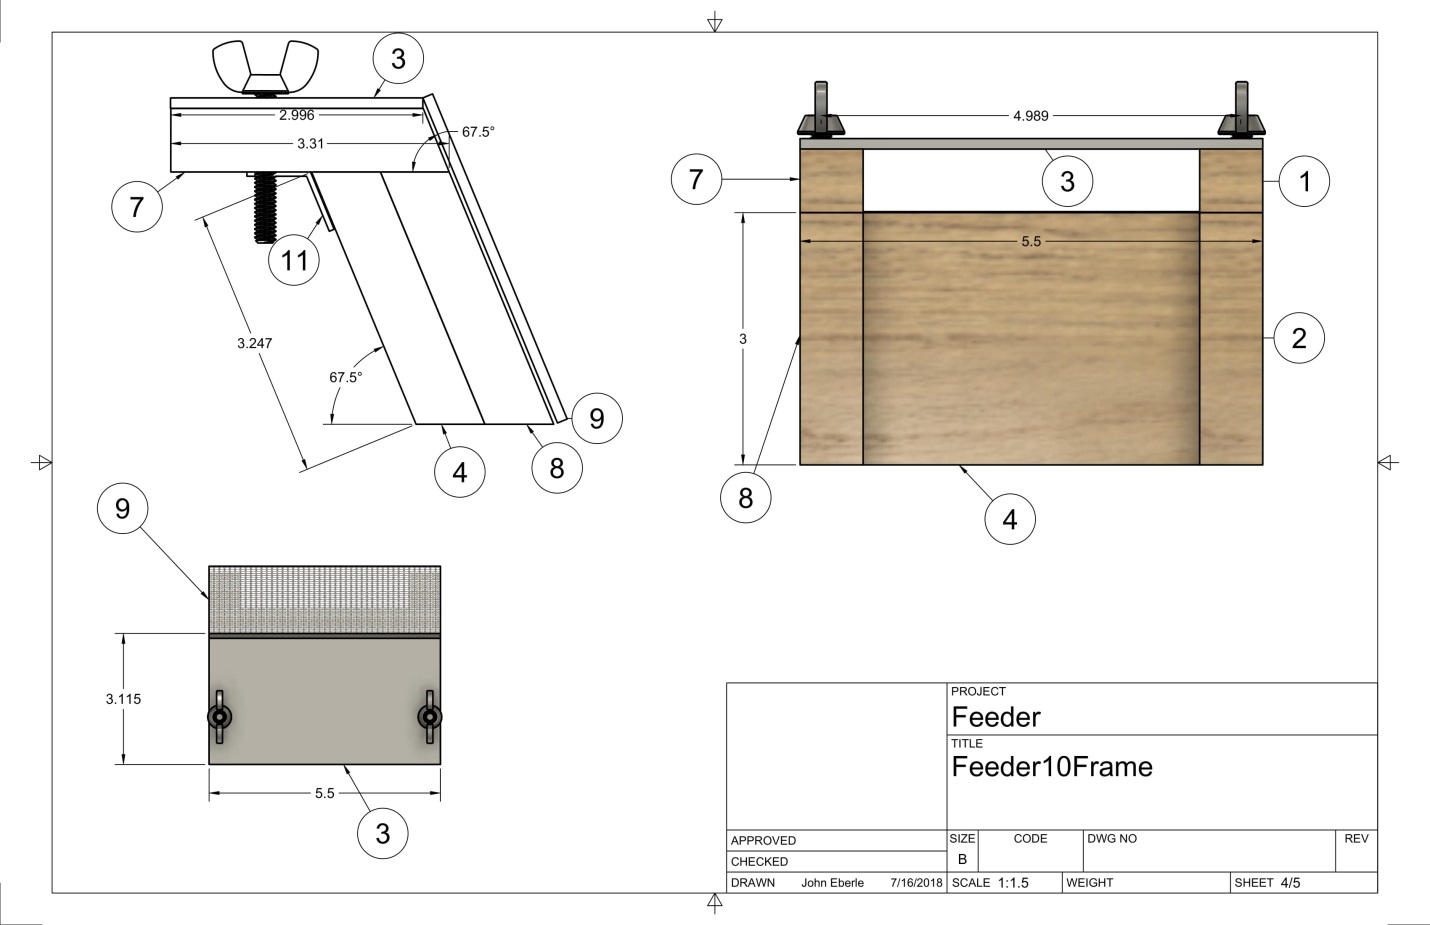
Figure 8
The last step is to add the mesh pieces to the feed house. Use 1/8” screen for this. The front mesh acts as the ladder down into the syrup for the bees. The back mesh piece fills any gap between the back of the feed house and the blocking strips. The front mesh is 5 ½” wide and about 4 ¼” long. I staple it in place on the top and sides. The back mesh (reference number 11 in Figure 6) is 5 ½” wide by about 2 ½” long and also stapled in place. At this point you’re done.
I use a Kingsford grilling aluminum pan from Lowes (PN in the BOM) . I simply remove the feed house from the studs and place the pan, then replace the feed house and place wingnuts on the studs to secure. Finally, place it on the hive and add a 50/50 sugar water mix.